|
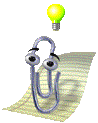
Office Assistant
 The animated Office Assistant appeared first in Office 97, to provide another way to get the help you need. Office Assistant can offer a suggestion based on what it thinks you are trying to do. Or you can type in a question in a natural way. The Assistant then lists topics that may help answer your question. The animated Office Assistant appeared first in Office 97, to provide another way to get the help you need. Office Assistant can offer a suggestion based on what it thinks you are trying to do. Or you can type in a question in a natural way. The Assistant then lists topics that may help answer your question.
[In Word 95 you do this kind of natural language search in the Answer Wizard.]
 With Office 2000 the Office Assistant has become transparent, but otherwise works the same as
before. With Office 2000 the Office Assistant has become transparent, but otherwise works the same as
before.
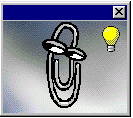
If there is a light bulb beside the Office Assistant, clicking it will bring up a tip about what you were just doing. If there is more than one tip on the topic, you can rotate through the list.
In the Step-by-Step section below you will use the Office
Assistant to learn about and apply paragraph and character styles.
|
|
Where you are:
JegsWorks > Lessons > Word97-2003
Before you start...
Project 1: Word Basics
Interface
Getting Started 
 Open Word Open Word
Word Settings
Help- Topics
Help-
Assistant
Format
Images
Pre-Print
Manage Printing
Summary
Quiz
Exercises
Project 2: Auto Tools
Project 3: Brochure
Project 4: Report
Search
Glossary
|
|
 |
Step-by-Step: Office Assistant |
|
What you will learn: |
to turn on Office Assistant
to use Office Assistant to get help
to learn how styles work
to apply paragraph & character styles
|
Start with:
 (Word is open with a blank document.) (Word is open with a blank document.)
Turn on Office Assistant
If you do not see the Office Assistant, it may be just hiding.
- From the menu choose .
- Click
on , the second item in the menu. The animated Office
Assistant appears on your screen.
If the second item is , then the Assistant is already showing on
your screen somewhere.
If the second item is grayed out, open the Help dialog by
clicking on the first item in the menu, close the dialog, and then look at the menu again.
Use Office Assistant to learn about Styles
-
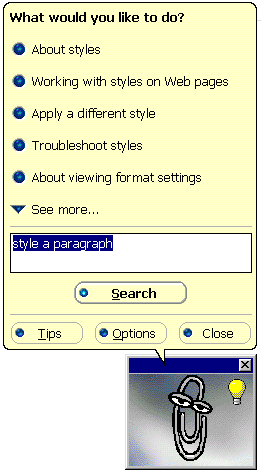 Open the Office Assistant dialog by clicking on the Assistant cartoon. Open the Office Assistant dialog by clicking on the Assistant cartoon.
 Or press the F1 key. Or press the F1 key.
The Office
Assistant dialog appears with questions that you might want to ask,
related to what you were just doing. Different versions have somewhat
different suggestions here.
- In the text box type style a paragraph
and then click the Search button. A list of topics about styles
appears.
 In Word 2003,
the list is in the task pane, Search Results. In Word 2003,
the list is in the task pane, Search Results.
- Click the topic:
 About styles. About styles.
 , ,
 About formatting text by using
styles.
About formatting text by using
styles.
A Help window
appears with an explanation of what styles are.
- Read the topic
and any related topics.
Look especially for information about how Word may be automatically changing your styles!
Then close Help.
The Office Assistant's list is gone (except in
Word 2003). How
sad! Do not lose hope!
- Double-click on the Office Assistant
again.
In versions before Word 2002, the list about styles is gone, but our search words are
still there.
- Click on Search to get the list back.
- Click on Apply a different style. Another Help
window appears.
- Read the
topic, especially the Tip at the bottom.
Word 2002: The Search list re-appears.
An improved version!
- In the Search box type auto update style
and then click the Search button.
- Click on the topic Automatically update a paragraph style.
- Read the topic.
Word 2003: The
Search Results task pane is still open.
- Click on Automatically update a paragraph
style
- Read the topic.
- Close the Help
window.
Apply Styles
Start with:
  Show Marks is on. Show Marks is on.
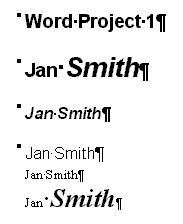
You will create a document like the one at the right by
using Styles.
- In your blank document type the words Word Project 1 and then press
ENTER to get a new line.
- Type your name and press the ENTER key to get a new line.
- Repeat the last step four more times for
a total of 5 lines that contain your name.
- Click in line 1 somewhere, without selecting any letters.
- Click on the arrow at the end of
 the Styles control. the Styles control.
- Select the style Heading 1. The style is
applied to the whole paragraph, which in this case is just one line.
You don't have to select the
whole paragraph. The cursor just needs to be somewhere inside the
paragraph.
The little square to the left of a
line means that this paragraph is styled with one of the
Heading styles. The Heading styles are used to create an outline of your document.
Not too helpful for this short document, but really nice for longer
ones.
[If you do not see the squares and paragraph marks, you need to
Show Marks by clicking
the Show Marks button. If you do not see this button, click on
the
 double arrow at the right edge of the Formatting toolbar to see
the hidden buttons.]
double arrow at the right edge of the Formatting toolbar to see
the hidden buttons.]
- Click in line 2
- Apply the style Heading 1 to it, as in the previous step.
- Click in line 3.
- Choose from the Styles drop list the style Heading 2.
- Continue, applying Heading 3 to line 4 and Normal style to line 5. No change occurs in line 5 with the
Normal style since that's what was already applied to the text.
- Move your pointer to the end of line 6.
- Select line 6 by dragging back across the line to the left.
- From the toolbar click on the
 Bold and Italics buttons and then change the size to 20 using Bold and Italics buttons and then change the size to 20 using
 the Size drop list. Then click in
a blank part of the document to deselect the text. the Size drop list. Then click in
a blank part of the document to deselect the text.
- On line 6, select just your first name by double-clicking it. (This works
for single words.)
-
While your first name is selected,
select from the
Styles list the style a Default Paragraph Font, which is a special character style rather than a paragraph
style.
A character style applies to just the selected text while a paragraph style applies to the entire paragraph. This special style will return the
selected text to the original paragraph style. This is one way to
dump a whole set of changes.
While your first name is selected,
select from the Styles list the style Clear formatting. This "style"
returns the selected text to its underlying paragraph style, clearing any
changes you made separately.
 If
you select the whole paragraph and apply Clear formatting, you will clear
the paragraph style as well as any separate formatting. This is a fast way to
get all the way back to the default font formatting. If
you select the whole paragraph and apply Clear formatting, you will clear
the paragraph style as well as any separate formatting. This is a fast way to
get all the way back to the default font formatting.
- Make the same changes on the second line, which has the style Heading 1- select the line, bold, italics, size 20, select first name
only, apply Default Paragraph Font style
(
Clear formatting.).
The result looks different from the previous line! You have returned
the paragraph to its original paragraph style.
For line 2 that is Heading 1 instead of Normal. You have to pay close attention to the
details or your head will start spinning!
 Save this document by clicking Save this document by clicking
 the Save button. Since this is a new
document, you will see the Save As dialog box. Name the document mystyles.doc and save it in the word project1 folder on your Class disk. the Save button. Since this is a new
document, you will see the Save As dialog box. Name the document mystyles.doc and save it in the word project1 folder on your Class disk.
 Print by clicking Print by clicking
 the Print button
on the toolbar. the Print button
on the toolbar.
- After your document prints
successfully, use the
 Close button for the document to close the document, but not
Word itself, if you are going to continue working
at this time.
Close button for the document to close the document, but not
Word itself, if you are going to continue working
at this time.
 Do not close a document until you have checked that the printing finished and was correct. Do not close a document until you have checked that the printing finished and was correct.
|